Polecat Blur manual

Atmospheric Sound Design Tool for Cinema and Games.

Standalone Desktop App and VST plugin.

Polecat Blur turns recorded or live source material into cinematic atmospheres, game-world ambiences, impacts, and evolving textures using spatial positioning, diffusion, delays, and modulation.

Part I — Installation, Activation and Configuration

Install Polecat Blur, then set the environment it will work in.

Installation and activation make the product available. Configuration establishes the audio and speaker environment around it, and is deliberately separate from the creative state stored in a preset.

1

Install

Run the installer. It places the standalone app, VST3 plug-in, and factory presets in their standard locations.

Important note: We are a small boutique software house and have not yet completed the developer certification process. You will definitely encounter security warnings during installation. We expect to have those warnings removed within the next few days.

2

Activate when ready

Your first installation includes seven days of full operation. To continue after that period, enter the commercial licence code supplied after purchase. A successful activation confirms the named user and entitlement.

3

Set up audio and MIDI

On its first use, the standalone app opens Audio/MIDI Options…. Choose your audio output device, then enable the input channels you need for recording. If you want to play Polecat Blur from a MIDI keyboard, enable that keyboard in the MIDI input list here too. The app remembers these choices. To change them later, open the three-line menu at the far right of the top toolbar and choose Audio/MIDI Options…. The same menu also lets you set your preferred language and visual theme.

In a DAW, insert the VST3 on the track whose channel format and routing you intend to use; the host provides the project audio and MIDI environment.

Polecat Blur licence activated dialog
Enter a commercial licence code after purchase to activate it.
Polecat Blur Settings tab with the application menu at the upper right
On first use of the standalone app, Audio/MIDI Options opens automatically. Later, open it from the three-line menu at the upper right.

Let the plug-in follow the track

In a DAW, Polecat Blur adapts to the number of channels supported by the track on which it is inserted. Set the track's channel format and routing as part of the project, then use the panner within that available layout. This keeps the instrument aligned with the session rather than asking a preset to define the project's output configuration.

When the available layout changes, the channel and speaker presentation in the panner adapts automatically. Check the panner before making detailed placement decisions, especially after moving the plug-in to a differently configured track.

Set Speaker Geometry once for the project

The Speaker Geometry switch in Preferences describes the fixed listening and output setup for the project. It controls the automatic arrangement of the green speaker dots, providing the reference against which you place the sound channels. Choose the geometry that matches the actual monitoring arrangement before you start panning.

Speaker Geometry is not stored in a preset. A preset recalls its sound and creative layout into the project's existing speaker configuration; it does not replace that configuration. This lets the panner automatically adapt the recalled channel layout to the fixed project setup instead of silently changing the room or delivery arrangement.

Read disabled spatial controls as information

The three Global Spatial Spread controls—Width, Depth, and Height—are available only where the session setup can use them. If the track and speaker configuration do not require a particular spatial dimension, its control is disabled. That is expected: the control cannot create an output dimension the current project does not provide.

Set up the project and Speaker Geometry first, then treat the enabled spread controls as the available global dimensions for the current session. Individual channel positions and their automation will adapt to the panner's current layout.

Keep configuration and sound design separate

Use Preferences and the host track configuration for stable environmental decisions: devices, channel support, speaker geometry, and monitoring arrangement. Use presets for the sound: captured content, Blur or Impact behaviour, filters, delays, movement, and creative channel placement.

This separation is useful when the same preset is opened in another project. The sound can be recalled, while Polecat Blur continues to respect the channel format and speaker arrangement of the project it has been placed into.

Part II — Operator's Tutorial

From a factory preset to your own recorded sound.

This is a first working session, not a tour of every control. Follow it in order once, then return to the Product Reference when you need a particular control or behaviour. Use the toolbar Play control for this walkthrough: it starts the continuous C3 note used to audition a patch, rather than treating Polecat Blur as a keyboard performance instrument.

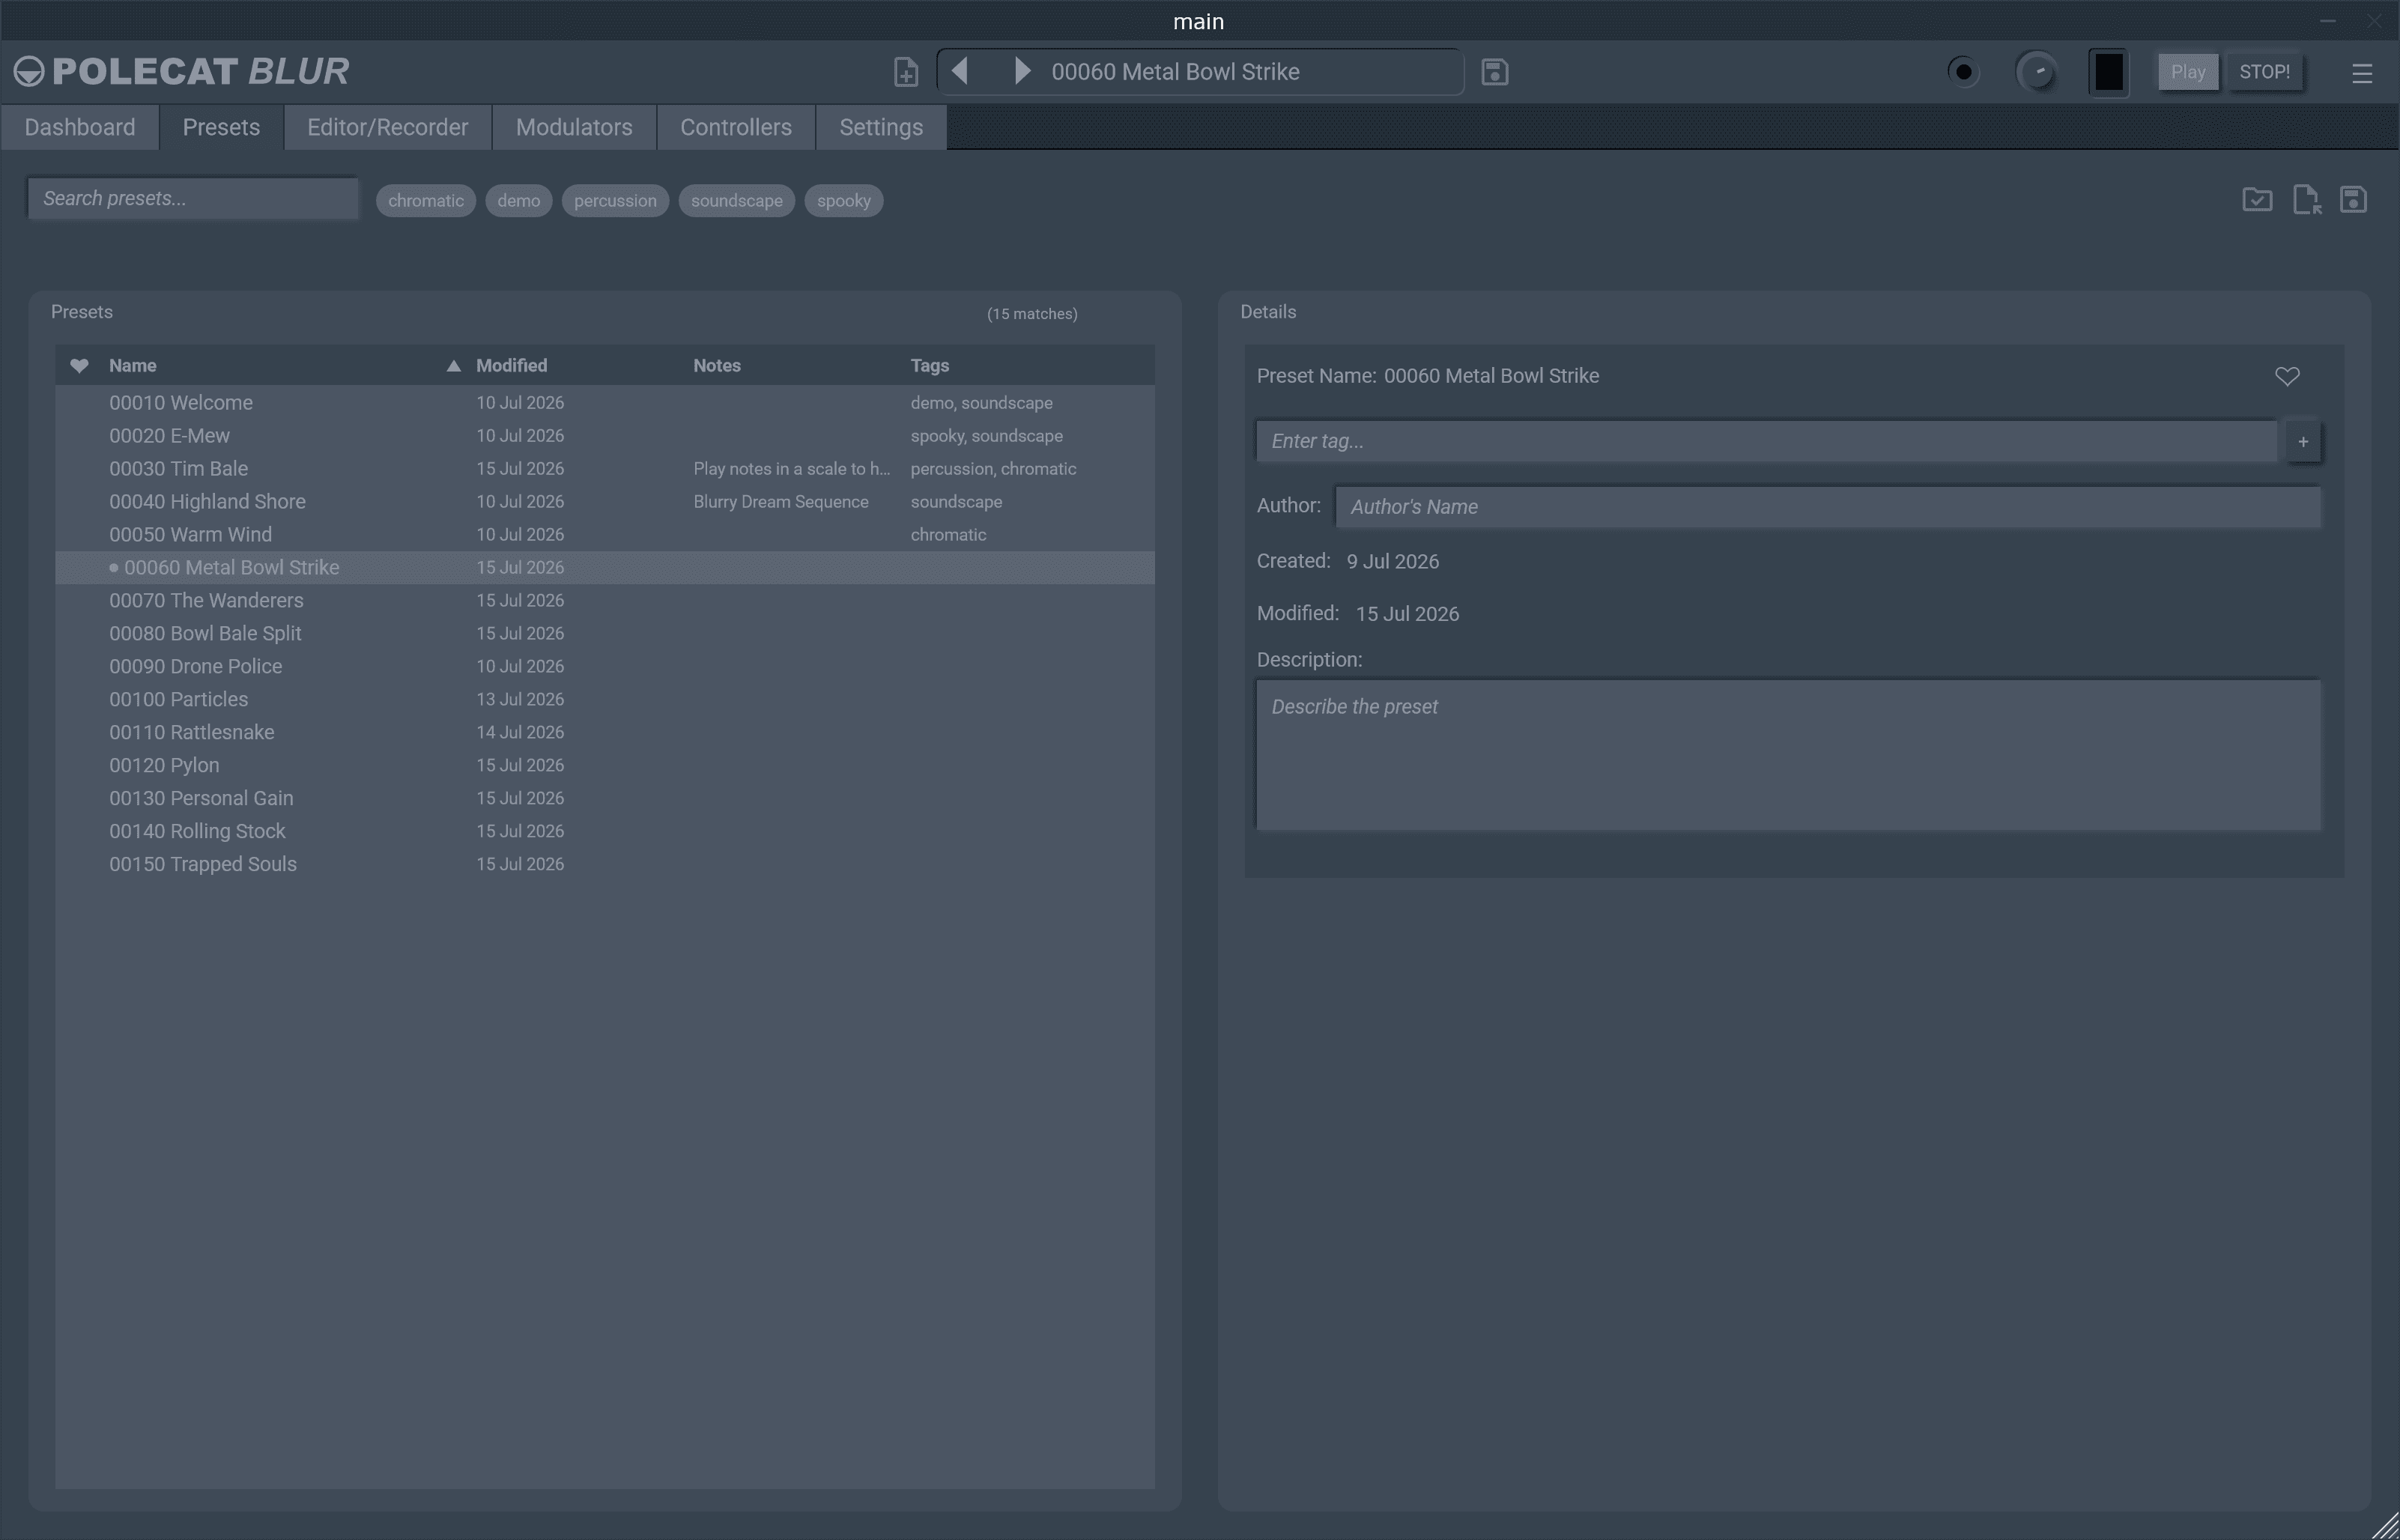
Polecat Blur Presets tab
Start by finding a preset whose character is close to the scene or texture you need.
1. Select and audition a preset

Open Presets and use search, tags, and notes to narrow the factory library. Choose the nearest starting point; the aim is to begin with useful motion and density, not to find a finished cue.

Load the preset, then press Play in the toolbar. Let it run long enough to hear the complete behaviour. Many sounds reveal their character only after their initial state: listen for changes in position, density, filter tone, and delay return rather than judging the first second alone.

Change one thing at a time as you listen. This makes it possible to distinguish the source, the Blur engine, spatial placement, delay network, and modulation instead of turning a promising preset into an untraceable collection of edits.

Operator's Tutorial · 2

Observe the sound field before moving it.

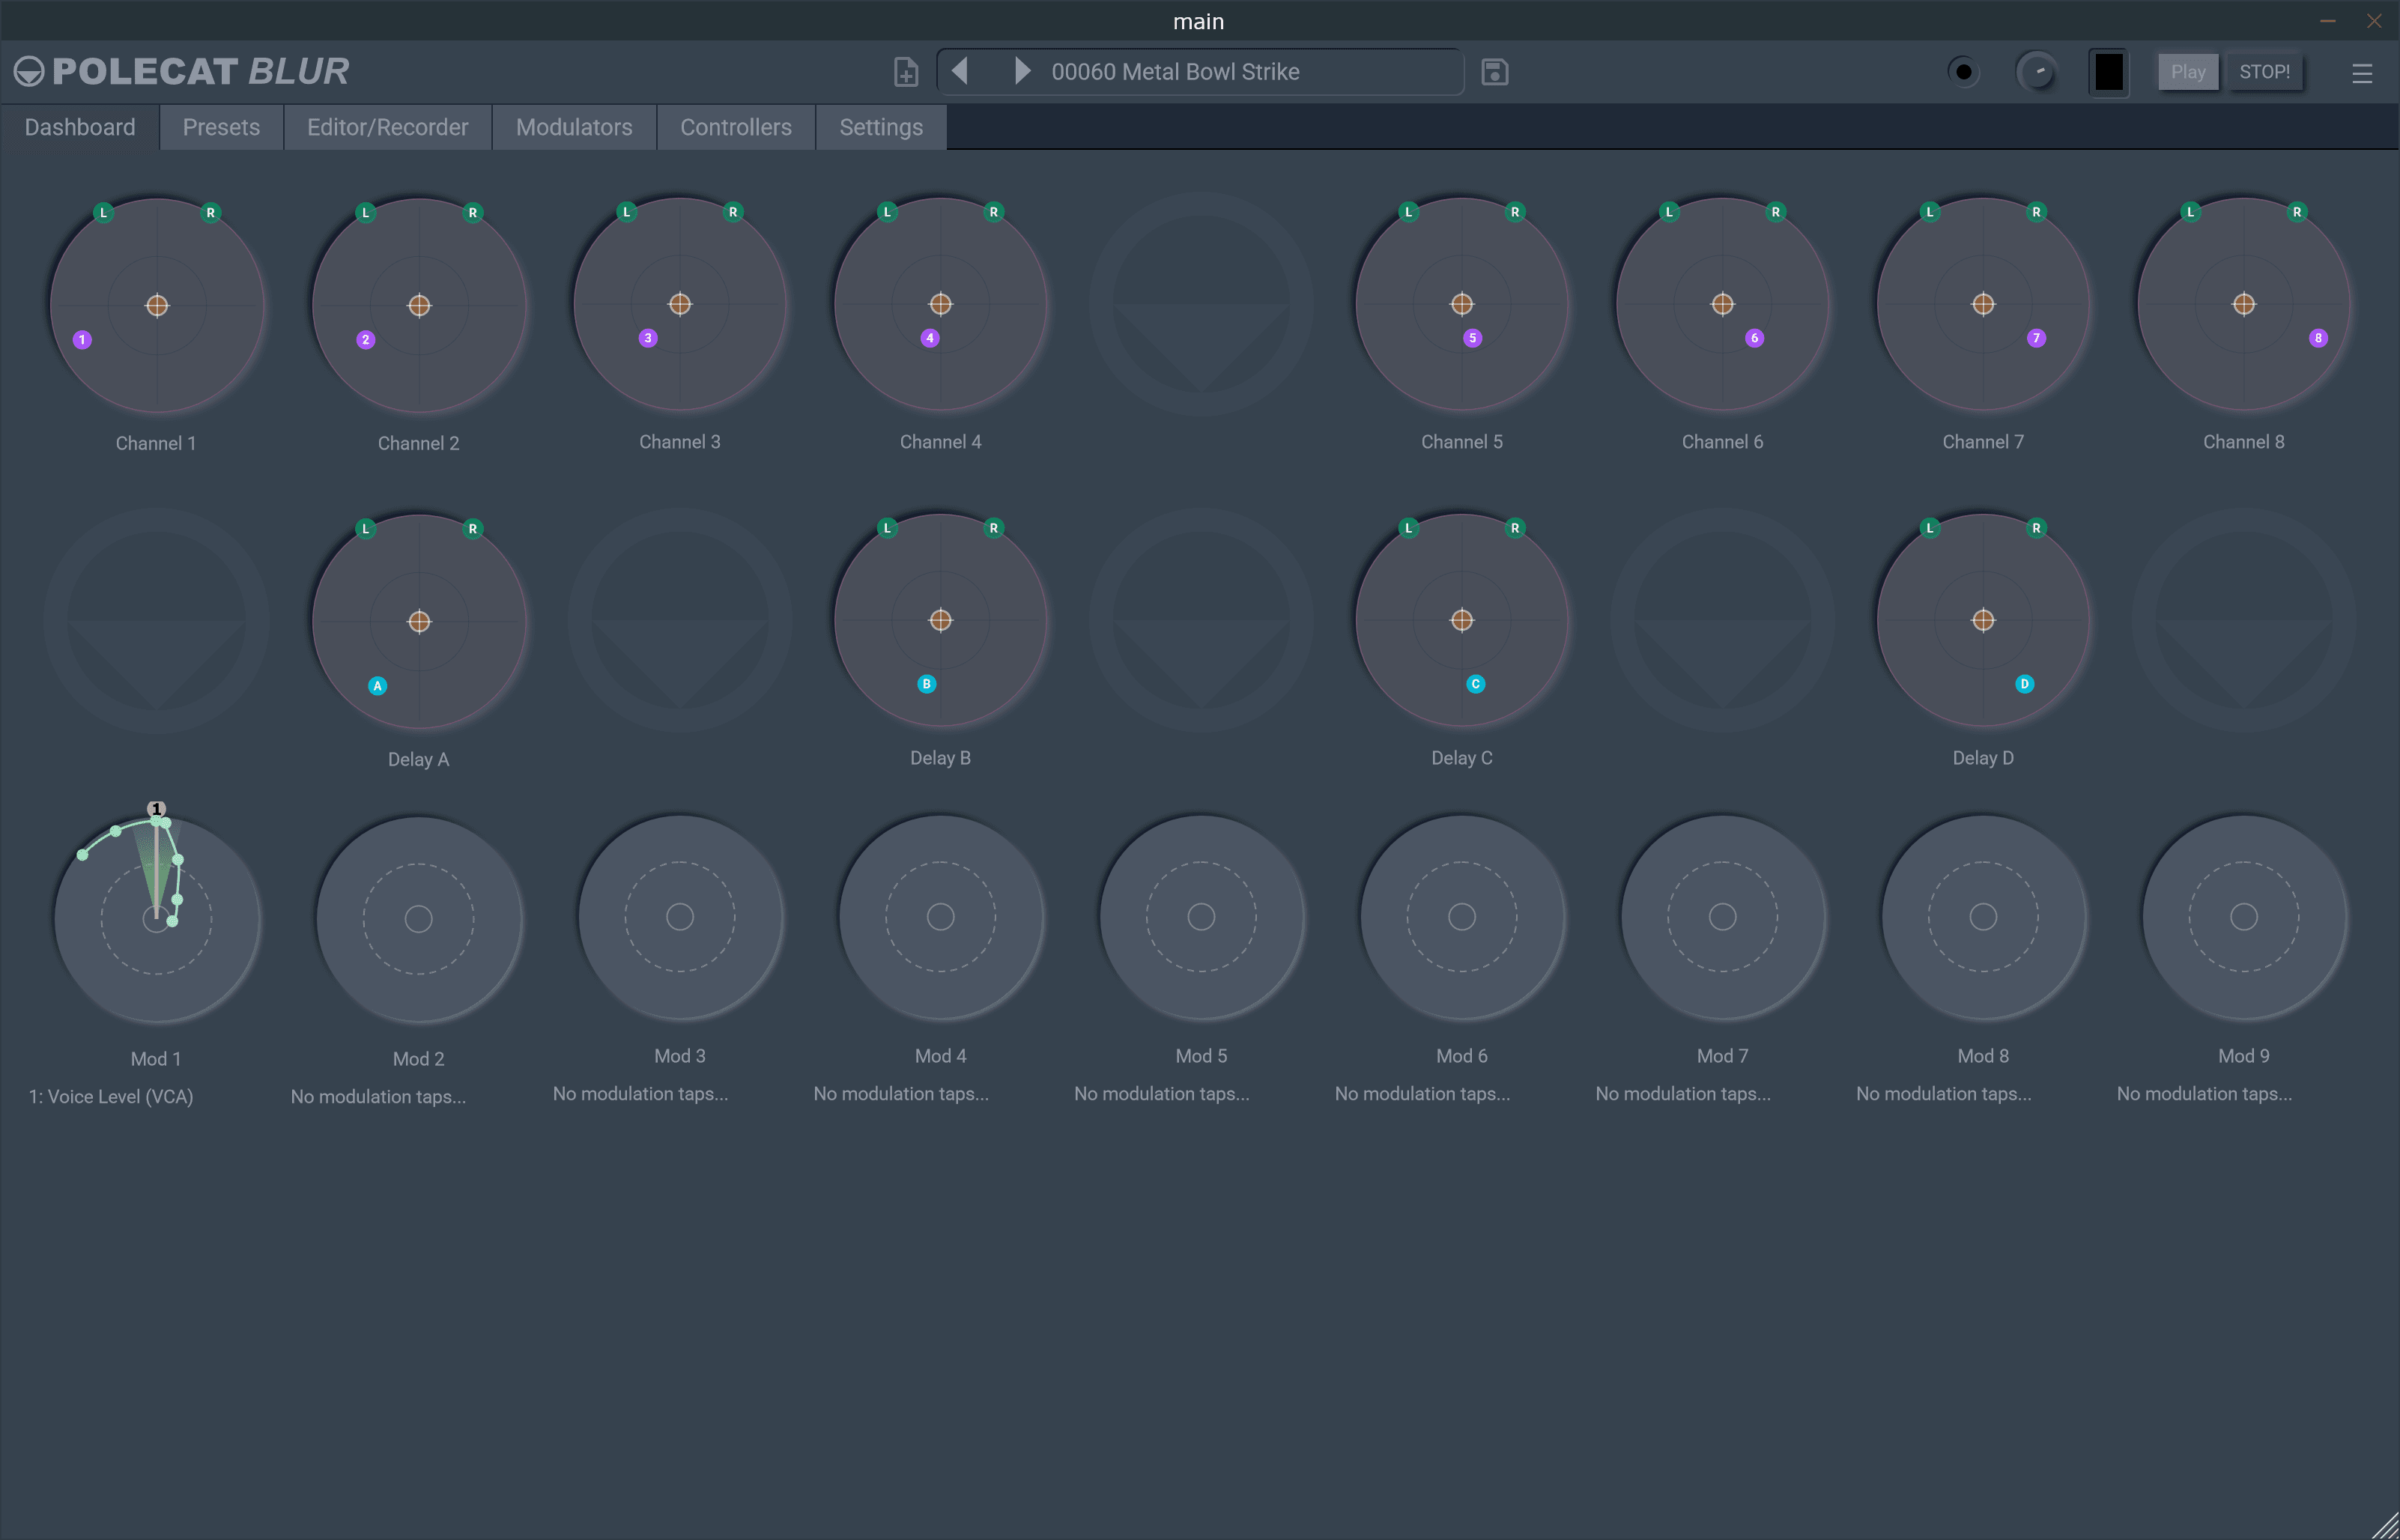
The Dashboard makes the current spatial and delay relationships visible. A moving channel dot is not decoration: it shows automation or modulation changing the channel's position in the surround field.

Polecat Blur dashboard and Surround Panner

Watch the Surround Panner

With the preset still playing, open the Dashboard and watch the dots in the Surround Panner. Some presets hold a channel in place; others make a dot travel through the field. That movement comes from the patch's stored control state and modulation. Notice which dots move, how quickly they move, and whether the delay returns appear to answer the dry channels. This is the quickest way to understand the preset's spatial design before editing it.

Make one deliberate spatial change

Select a channel dot and drag it to a clear, slightly offset position. Listen to the result while the preset continues. Then return it to its original location or reload the preset. This simple comparison establishes what direct placement contributes before you edit motion, width, depth, height, or delay positions.

Shift-click a dot to mute that channel. Alt-click to solo it; click empty panner background to deselect and release all solo. Isolating a moving channel makes it much easier to hear whether its motion is useful or merely busy.

Keep the global field separate

Use Global Spatial Spread for the overall Width, Depth, and Height of the patch. These controls reshape the field around the individual channel positions. Start by moving one global control a modest amount, then restore it before trying the next. If a preset needs focus, reduce the global spread before collapsing every individual channel into the centre.

Do not assume every visible movement needs to be changed. First establish whether the motion is an essential part of the sound. The Modulators and Controllers reference later in this manual explains how those movements are built.

Operator's Tutorial · 3

Using your own sound recordings

Once the preset's behaviour is familiar, retain its useful spatial and delay structure while replacing the recorded material on one channel. Work on a copy or save the preset under a new name before recording.

Alternatively, once you understand what's going on, you may want to start a new preset completely from scratch using the New Preset button to the left of the preset name on the top toolbar.

The Length dial in the Blur section changes the sample buffer length from one quarter to four times its default length. If the results sound too resonant on a particular sound source, press Erase, change Length, and try again.

Be sure to drag the channel dot for the channel you're working on to the appropriate place in the soundfield in the large central panner.

Importing sounds into Polecat Blur

In Editor/Recorder, select the channel that should receive the sound. Its Load / Import icon is in the channel header, alongside the Copy, Paste, and Save controls. Select it to open the file chooser, then choose the file to bring into that channel.

Load / Import accepts WAV audio files and Polecat Blur layer files (.mkl). It replaces the selected channel's current recorded content, so save or copy a useful channel before loading another file.

Recording new sounds

The Record functionality allows you to add new sound sources on top of what is already stored in that channel. If you want to start with a clean recording, press Erase to clear what is already there. Loading a WAV file always replaces what is already there.

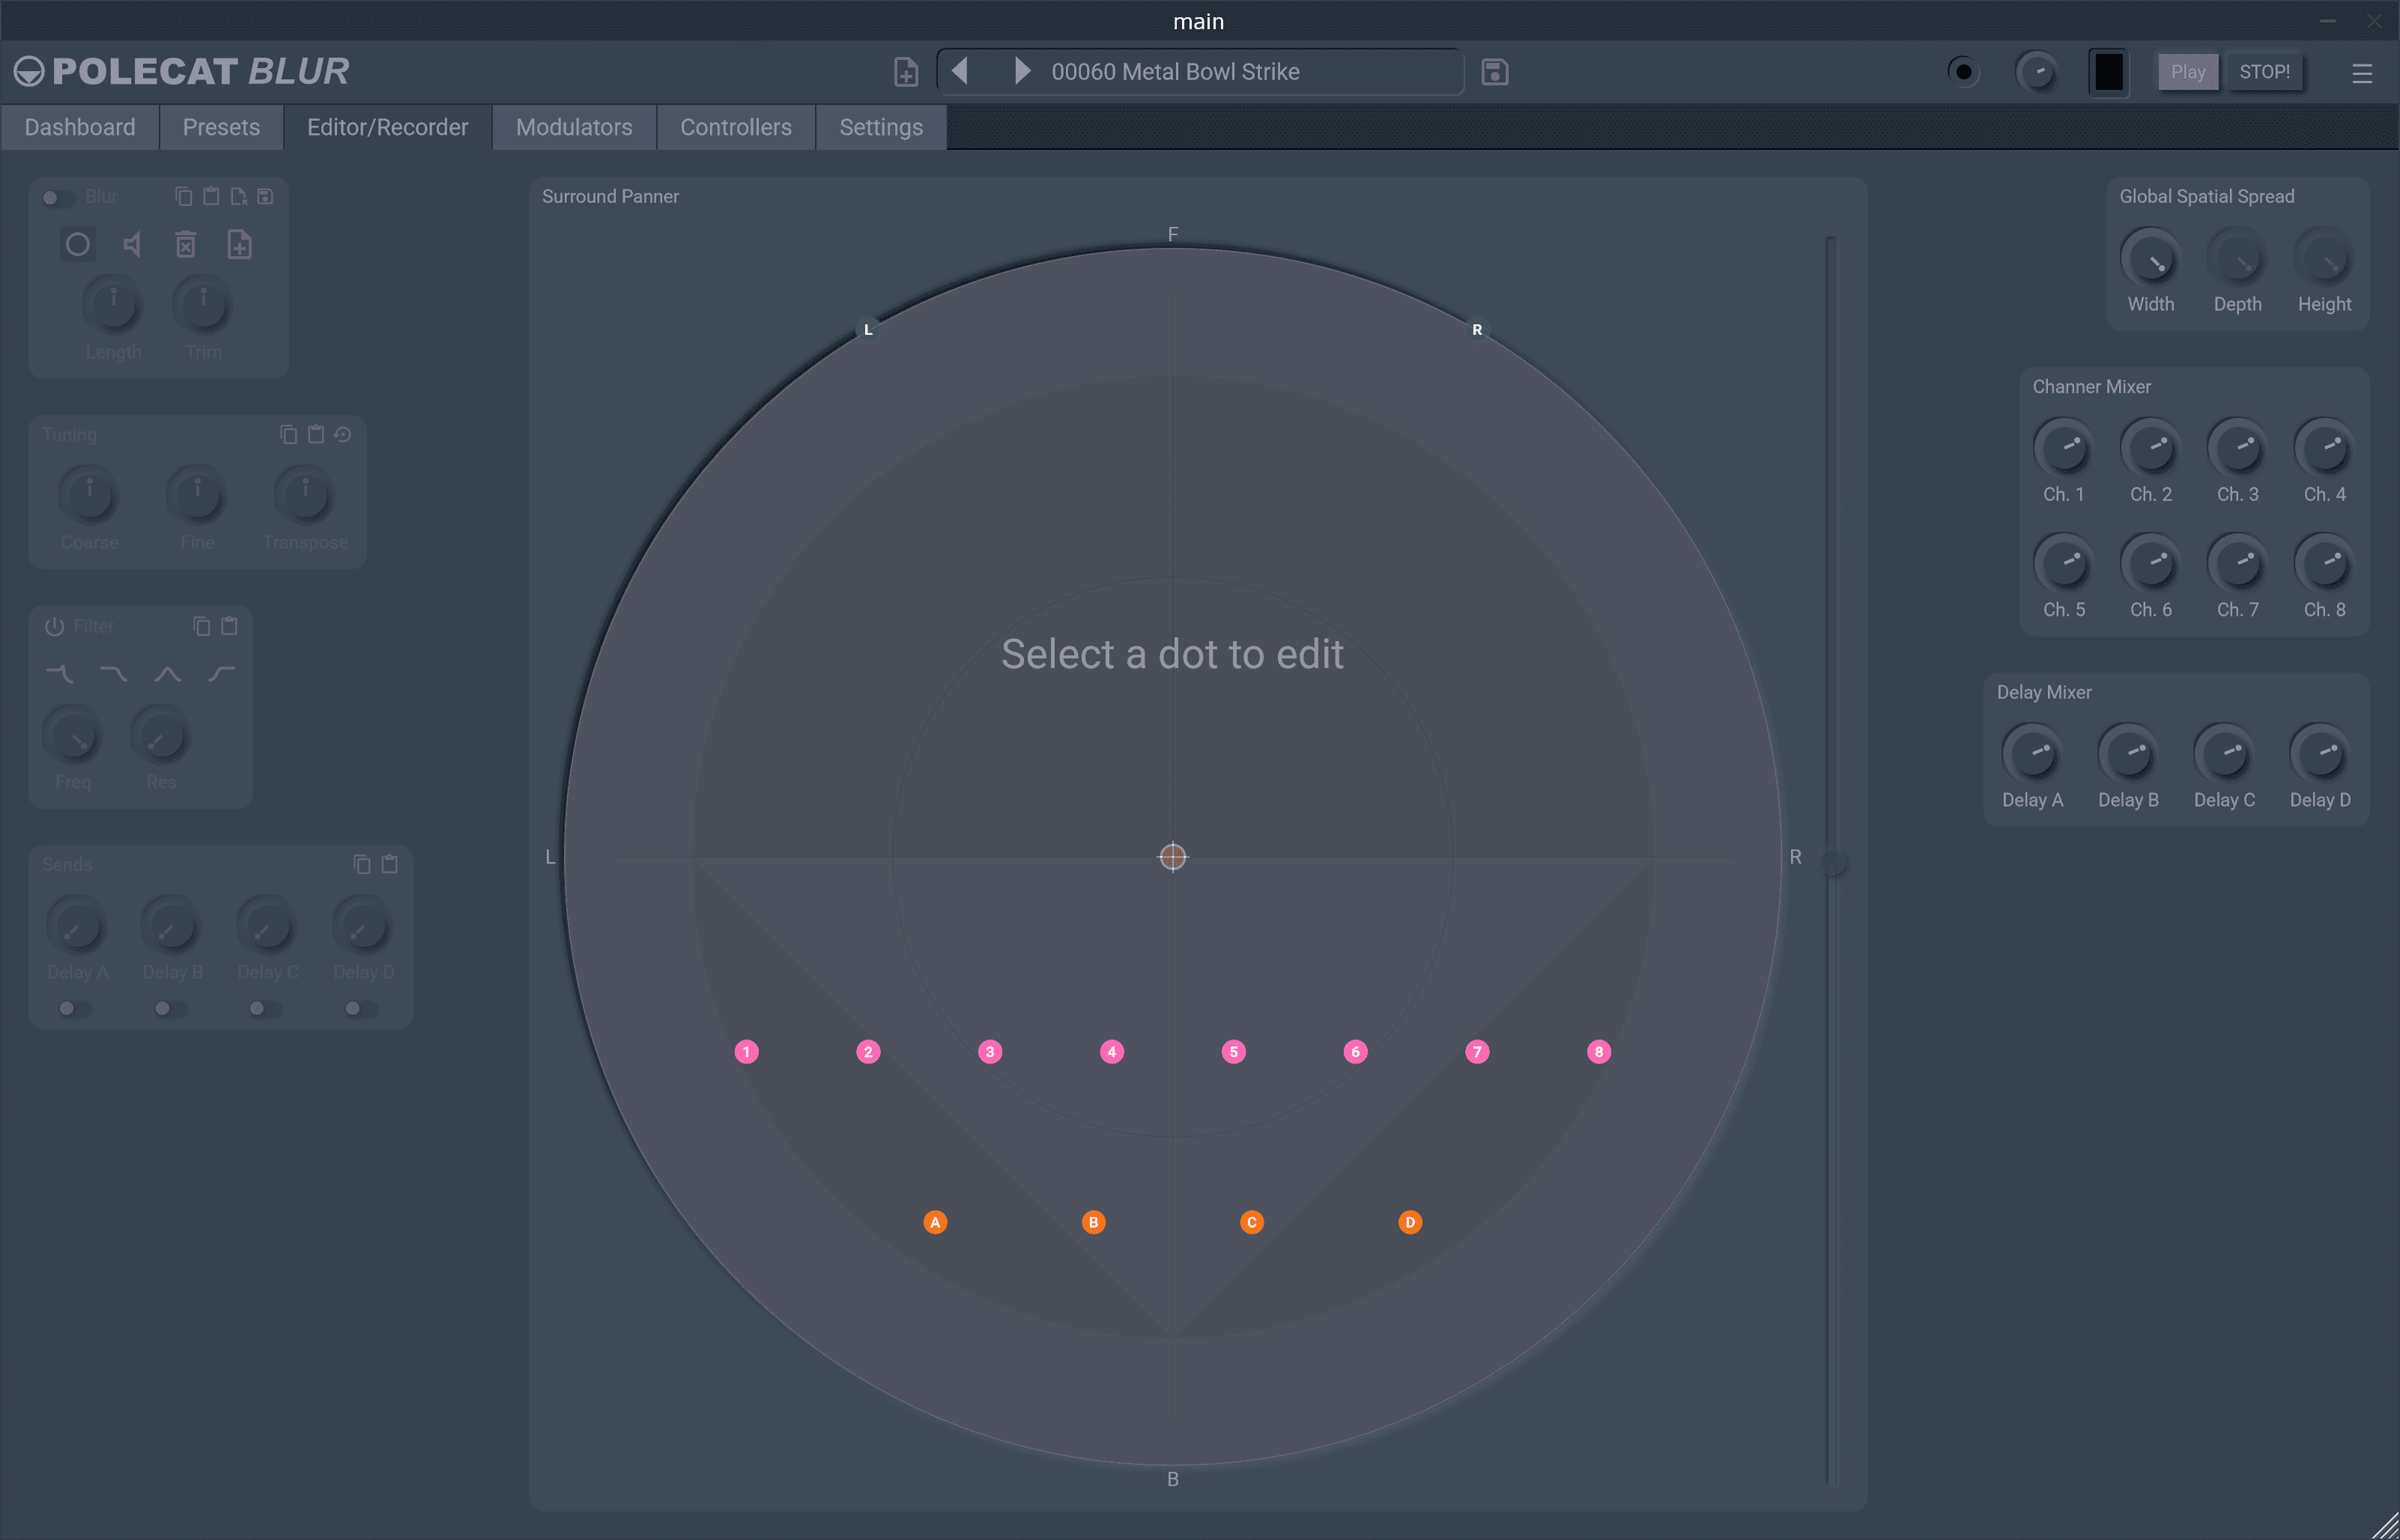
Polecat Blur Editor Recorder view
The Editor/Recorder is where an incoming source becomes material for a channel.

In the standalone app, Polecat Blur receives audio from the soundcard inputs selected in Audio/MIDI Options…, available from the menu at the right-hand end of the top toolbar. Input routing in the plug-in varies by DAW: REAPER makes it explicit, while other hosts may present Polecat Blur's inputs as sidechain inputs. In that case, configure them as you would the input for a sidechain compressor.

Select the channel to replace, then use Monitor to hear its input before recording.

Set Record on the selected channel and perform or play the source. Turn Record off when the useful span is captured. Press Play to hear it run as a continuously active layer, then compare it with the original material. Use Erase to capture another take without discarding the rest of the patch.

If the source has an abrupt onset or an overly literal transient, switch Record Via Allpass on and record a second take. The all-pass stage diffuses the input before capture and can soften an impact into material that blurs more readily. Leave it off when the transient itself is the detail you want to preserve. Record Fade In/Out is useful when you need a softer capture boundary.

Operator's Tutorial · 4

Tune the Blur, then save a usable variation.

The recorded source and the active Blur length interact. Treat tuning as listening work, not a fixed setting.

Sweep Length to manage resonance

While the channel plays, slowly move Length. At some spans the captured sound can reinforce particular pitches or partials, producing a ringing or resonant quality. This may be exactly the effect you want; it may also conflict with the chosen source or the cue's harmony.

Continue sweeping until the undesirable resonance reduces or disappears, then make smaller adjustments to find a useful balance of density, pitch, and movement. Do this before reaching for broad EQ-like changes: the material supplied to the Blur engine often determines the resonance more fundamentally. Use Trim to correct the recorded source gain and Level for the channel's balance in the patch.

Keep the changes that answer a need

Once the new source, Blur length, and spatial placement serve a real use case, save a named preset. Name it for the material and role rather than its history: for example, a restrained room texture, a metallic transition, or a playable drone. This makes later browsing practical.

Repeat the same method with another source, but preserve only the changes you can describe. A small library of purposeful variations is more useful than a long list of near-identical experiments. The rest of this manual is the reference path for extending this tutorial with filters, delays, modulation, controller curves, and session settings.

Part III — Product Reference

Presets and auditioning.

Use the Presets tab to find, preview, load, and develop sounds. It is the first reference topic because it is the normal entrance to the instrument and the safest place to understand what is currently active.

Polecat Blur Presets tab, with the audition bar in the top toolbar
The preset list is on the left. The audition bar is the centred strip in the top toolbar, between its left and right navigation arrows.

Single-click a preset in the list to preview it. A preview temporarily replaces the sound you hear so you can audition it without loading it as the working preset. The top-toolbar audition bar identifies the previewed preset; it is the horizontal strip containing the preset title and its navigation controls.

Double-click a preset to load it. Loading makes it the current working sound rather than a temporary preview.

Use the audition bar's close button to end the preview and return to the sound that was loaded before it. It is the explicit way to abandon an audition.

Experiment during a preview

A previewed sound remains editable. Change controls, record material, or explore its routing while it is being previewed; this is useful for finding out whether a preset has potential before committing to it.

Closing the audition bar restores the previously loaded sound, including the state it had before the preview. Treat preview edits as temporary exploration unless you choose to save them.

Compare an edit with its original

When you are editing a loaded sound, double-click its title in the audition bar to toggle between your edited state and the original preset. Use this as a direct A/B comparison: listen for what the edit actually contributes, then double-click the title again to return to the edited state.

This comparison applies to an edited, loaded sound. It does not replace the close button's separate job of leaving a temporary preview and restoring the previously loaded sound.

Move through the filtered results

The left and right arrows in the audition bar move backwards and forwards through the current search results. This is faster than returning to the list for every audition and preserves the context established by your search and tags.

When a filter icon is present, click it to clear the active filter. The full preset list is then available again. Search, tags, notes, and the filter state are therefore useful for narrowing a deliberate listening pass before you navigate with the arrows.

Save is the commitment point

If you edit a previewed sound and then save it, the preview becomes the sound you are keeping. At that point, any previously loaded sound that was being edited is discarded. Save that earlier work first if it matters; do not rely on the preview close button to recover it after saving the preview.

A safe pattern is to save the current edited sound before beginning an extended preview experiment, then save the promising preview under an intentional name only once you are ready to replace that working state.

Workspace and preset management

A single instrument, arranged for exploration.

The main navigation divides the work into sound, stored ideas, source editing, movement, external control, and application settings.

Polecat Blur dashboard

Dashboard — see the field at a glance

The dashboard presents the current channel and delay relationships together. Use it to understand the state of a patch before making focused changes elsewhere.

Polecat Blur Editor Recorder view

Editor/Recorder — develop the source material

Use the editor and recorder area when the sound begins with captured or prepared material. It is the practical starting point for building a scene, an impact, or a sustained texture.

From input to a moving sound field

Prepare an empty channel, listen to the incoming source, record a useful span, then play it continuously while shaping its position, tone, and delay network. The cards below follow that order so the first pass is repeatable rather than mysterious.

Start and stop the instrument

Play in the top toolbar starts a continuous note, so the current recorded material can run without holding a key. This is the normal way to develop unpitched drones and sustained textures: press Play, make adjustments, and let the result continue while you listen.

STOP! immediately ends that playback and stops any active recording. Keyboard and MIDI input are also supported, but playing a note automatically disengages the toolbar Play button. That makes a played note the deliberate, pitched alternative to continuous playback.

Get sound into Polecat Blur

In the standalone application, open Settings and choose the audio input and output device, channel routing, and MIDI input you intend to use. The standalone app is usually the quickest option for microphones, interfaces, hardware instruments, field recordings, or any other external source: select the interface, monitor it, and record directly into a channel.

In a DAW, use the VST3 version when the source is already in the project—especially a soft synth. Route the synth or audio track to Polecat Blur's input as your host provides, then record that signal into a channel. Let the DAW manage the project sample rate and audio device; use its MIDI routing if you want to play Polecat Blur from a controller.

Use New before starting a fresh idea

The New button in the top toolbar creates a fresh, empty patch. It stops playback and recording, clears the recorded channels, and returns the instrument to its starting state. Save the current preset first if there is anything worth keeping. This is the full-session reset; it is not the same as clearing one channel.

Monitor and Record

Select the channel you want to build. Use Monitor to audition its incoming source before committing it: set the source level, verify the routing, and listen for noise or an unwanted channel. Then enable Record to capture that input into the selected channel; turn Record off when the take contains the material you need, then press Play to hear it as a continuously running layer. Record is additive: it always adds the incoming material to audio already in the channel. Press Erase first when you want a replacement take rather than another layer.

The additive behaviour is intentional. Record several compatible passes into one Blur channel when you want a denser, more complex source before it reaches the Blur engine. Monitor each new pass, keep the level controlled, and stop to audition the accumulated result; otherwise the channel can become crowded before the spatial and filtering decisions have a chance to do useful work.

With only one channel in Record, Polecat Blur makes a mono recording of all available inputs mixed together. This is useful when several inputs are meant to become one source. Put Record on more than one channel when the inputs should remain separate: each recording channel then receives only the audio connected to that specific channel, rather than the combined input mix.

In Preferences, Record Latching chooses how the Record button behaves. With it enabled, Record stays on until you turn it off; use this for a measured capture or an accumulating layer. With it disabled, Record is momentary and captures only while held, which is useful for short sounds and tightly timed snippets.

Load a saved channel or WAV file

Use the channel Load / Import icon when the source already exists. It can load a saved Blur/channel preset or a WAV file directly into the selected channel. This is useful for returning to a prepared source, bringing a field recording into the instrument, or moving a recorded idea between sessions. The Preset browser and the circular modulator editor have their own Load controls, which are unchanged.

Load / Import is a replacement operation: loading either kind of file erases the audio content currently in that channel before the new material is brought in. Copy or save the current channel first if its content matters. Use Record instead when the goal is to build on the existing audio, rather than replace it.

Erase, channel New, copy, and paste

Erase clears only the recorded audio from the selected channel. Its channel settings remain in place: use it when the next take should keep the current sound design, position, routing, and control choices. The channel's New control is the full reset. It stops recording, clears the audio, and restores all settings for that channel to their starting state, including its spatial dot and channel-specific movement. Use Erase to replace the source inside an existing design; use New to start that layer again from scratch.

Auto Monitor in Preferences can make either operation faster. With it enabled, pressing Erase or channel New automatically puts the cleared channel into Monitor mode, so its incoming sound is immediately audible and ready to check before recording. Disable Auto Monitor when you need to decide manually when a cleared channel should hear its input.

The channel Copy and Paste controls copy the complete channel: its recorded content and channel settings move together to the destination channel. Paste replaces existing content, so use it intentionally. This is the fastest way to duplicate a useful recorded layer before making a variation. The Tuning, Filter, and Sends panels also have their own Copy and Paste controls; those copy only that panel's settings, letting you share one treatment without overwriting a channel's recorded material or other choices.

Choose Blur or Impact before recording

Each channel has two content modes. Blur continuously works with a selected span of recorded material, making it the natural choice for drones, tone, diffusion, and evolving textures. Impact plays the recorded material as a one-shot, making it the natural choice for an attack, hit, scrape, or other event whose initial transient matters. Set the mode before you record the channel.

For an impact, record the source, then trigger the channel and adjust Start while listening. Start chooses where the one-shot begins in the newly recorded material. Sweep it from the beginning until the transient is found, then make smaller moves to decide whether the sound should begin exactly on the attack or a little before it. This is particularly useful when recording began before the hit, or when a take contains several possible attacks.

Impact and Blur are often used as a pair: keep the transient in an Impact channel, then copy the recorded channel to another channel, switch that duplicate to Blur, and shape the tail into a wider, sustained layer. The Impact provides definition; the Blur supplies the atmosphere that follows it. Balance and place the two independently so the tail supports the hit rather than masking it.

Build stereo or multichannel variations from one recording

To create a wider version of a recorded sound, Copy the source channel, select an empty destination channel, and Paste. The destination receives the same material and complete channel state. Set a different Start point on the copied channel, then place the two channels at different positions in the Surround Panner. The offset Start points make the pair read as separate views of the same recording rather than a perfectly coincident duplicate.

Repeat this into additional channels when the sound calls for a multichannel construction. Keep the offsets small and purposeful at first, then vary position, level, filter, or Blur length one parameter at a time. Copy the whole channel when the source should travel with its settings; use the Filter or Sends panel Copy/Paste when only that treatment should be shared across several independently positioned channels.

Tune a Blur to the recorded material

Length changes the span of material used by a Blur. Sweep it while the layer plays: particular lengths can reinforce a pitch or partial and create a ringing resonance; other lengths can reduce or remove it. Do not assume the first useful length is the right one. Deliberately try several shorter and longer settings, then return to the most promising area and make small adjustments while listening in the context of the other channels.

When a Blur fights the pitch or spectral weight of the source, tuning it downwards is often more productive than tuning it upwards. Lower tuning commonly gives the material room to become denser and less insistent; upward tuning can emphasise unwanted brightness or resonance. It is a listening rule, not a prohibition—use the direction that serves the sound. Trim is the corrective gain stage for the recorded source, while Level sets the channel's musical balance. The Preferences Allpass option diffuses the input before recording; enable it to soften a literal or percussive source, but leave it off when transient clarity matters.

Place the recorded channel in space

In the Surround Panner, select the dot for the recorded channel and drag it around the field. Moving it left, right, forward, back, up, or down changes where that channel appears in the output. Start with a clear, slightly offset position so layers do not all occupy the centre; then use the Global Spatial Spread controls to decide how wide, deep, and high the complete result should feel.

A plain click selects a dot. Shift-click toggles that channel's mute state, and Alt-click toggles solo, which can be extended to several dots. Shift-Alt-click sends whatever is under the cursor to the back, so an overlapping dot underneath becomes reachable; it is a gesture in its own right and does not also mute or solo. Clicking the empty panner background deselects everything and releases all solo. These gestures apply to speaker dots as well as channel dots. The pan handle keeps its double-click to reset to centre, which is now the only double-click on the panner.

The panner also responds to the keyboard whenever the application has focus, without needing to be clicked first. Press 18 to select a channel dot, Shift+AD to select a delay dot, and 0 to deselect everything and release solo. The letters are uppercase deliberately: lowercase ad belong to the QWERTY note keyboard and still play notes, so the shortcuts take nothing away from playing the instrument.

Shape the tone with the filter

Enable the channel filter, choose its type, then set Frequency for its operating point and Resonance for emphasis around that point. Lowpass retains the material below the frequency and removes progressively more high content above it; use it to place a layer behind the foreground or make repeats recede.Highpass does the inverse, removing low weight below the frequency; use it to clear rumble, make room for an Impact, or keep an atmospheric layer from filling the whole mix.

Bandpass focuses the material around a chosen region while reducing both lows and highs. It is useful for finding a narrow, characterful part of a field recording or making a layer feel more distant. Ladder is the fourth filter model; use it when its own response gives the Blur a more suitable character than the other three models. In every type, increase Resonance cautiously: it makes the frequency point more pronounced and can quickly become the dominant feature of a resonant Blur.

Copy the Filter panel to carry the enabled state, filter type, Frequency, and Resonance to another channel, then Paste it there. This is the right way to apply the same tonal treatment to different recordings without copying their content. The cutoff can also be modulated; begin with a low modulation amount so the underlying filter decision remains audible.

Build repeats and ping-pong movement with delays

Send a channel to one or more of the four delays, then set each delay's time, feedback, filtering, and output level to place its repeats around the dry layer. Start with one delay and a modest send; add a second when the first repeat has a useful role rather than simply making the patch louder.

Each channel-to-delay Send has a Pre/Post Filter switch. Pre sends the channel to the delay before that channel's filter; Post sends it after the filter. Choose Pre when the delay should receive a more uniform version of the source while the dry channel is filtered separately. Choose Post when the channel's filtering should be part of the delayed signal, so the delay inherits that tonal decision.

Delays can also send into other delays. For a basic ping-pong, send Delay A into Delay B and Delay B back into Delay A, then use different times and positions for each side. On these inter-delay sends, Pre takes the signal before the sending delay's filter, while Post takes it after that filter. A Pre path is useful when you want comparatively uniform repeats; a Post path lets filtering become part of the recirculating route, so its coloration can build as the delay regenerates. Keep inter-delay send and feedback amounts conservative at first: their combined recirculation can build density very quickly. Filter the returns when you want repeats to soften or recede with each pass.

Motion

Make the space perform.

Polecat Blur becomes especially expressive when motion and controller data are treated as part of the sound—not as finishing touches.

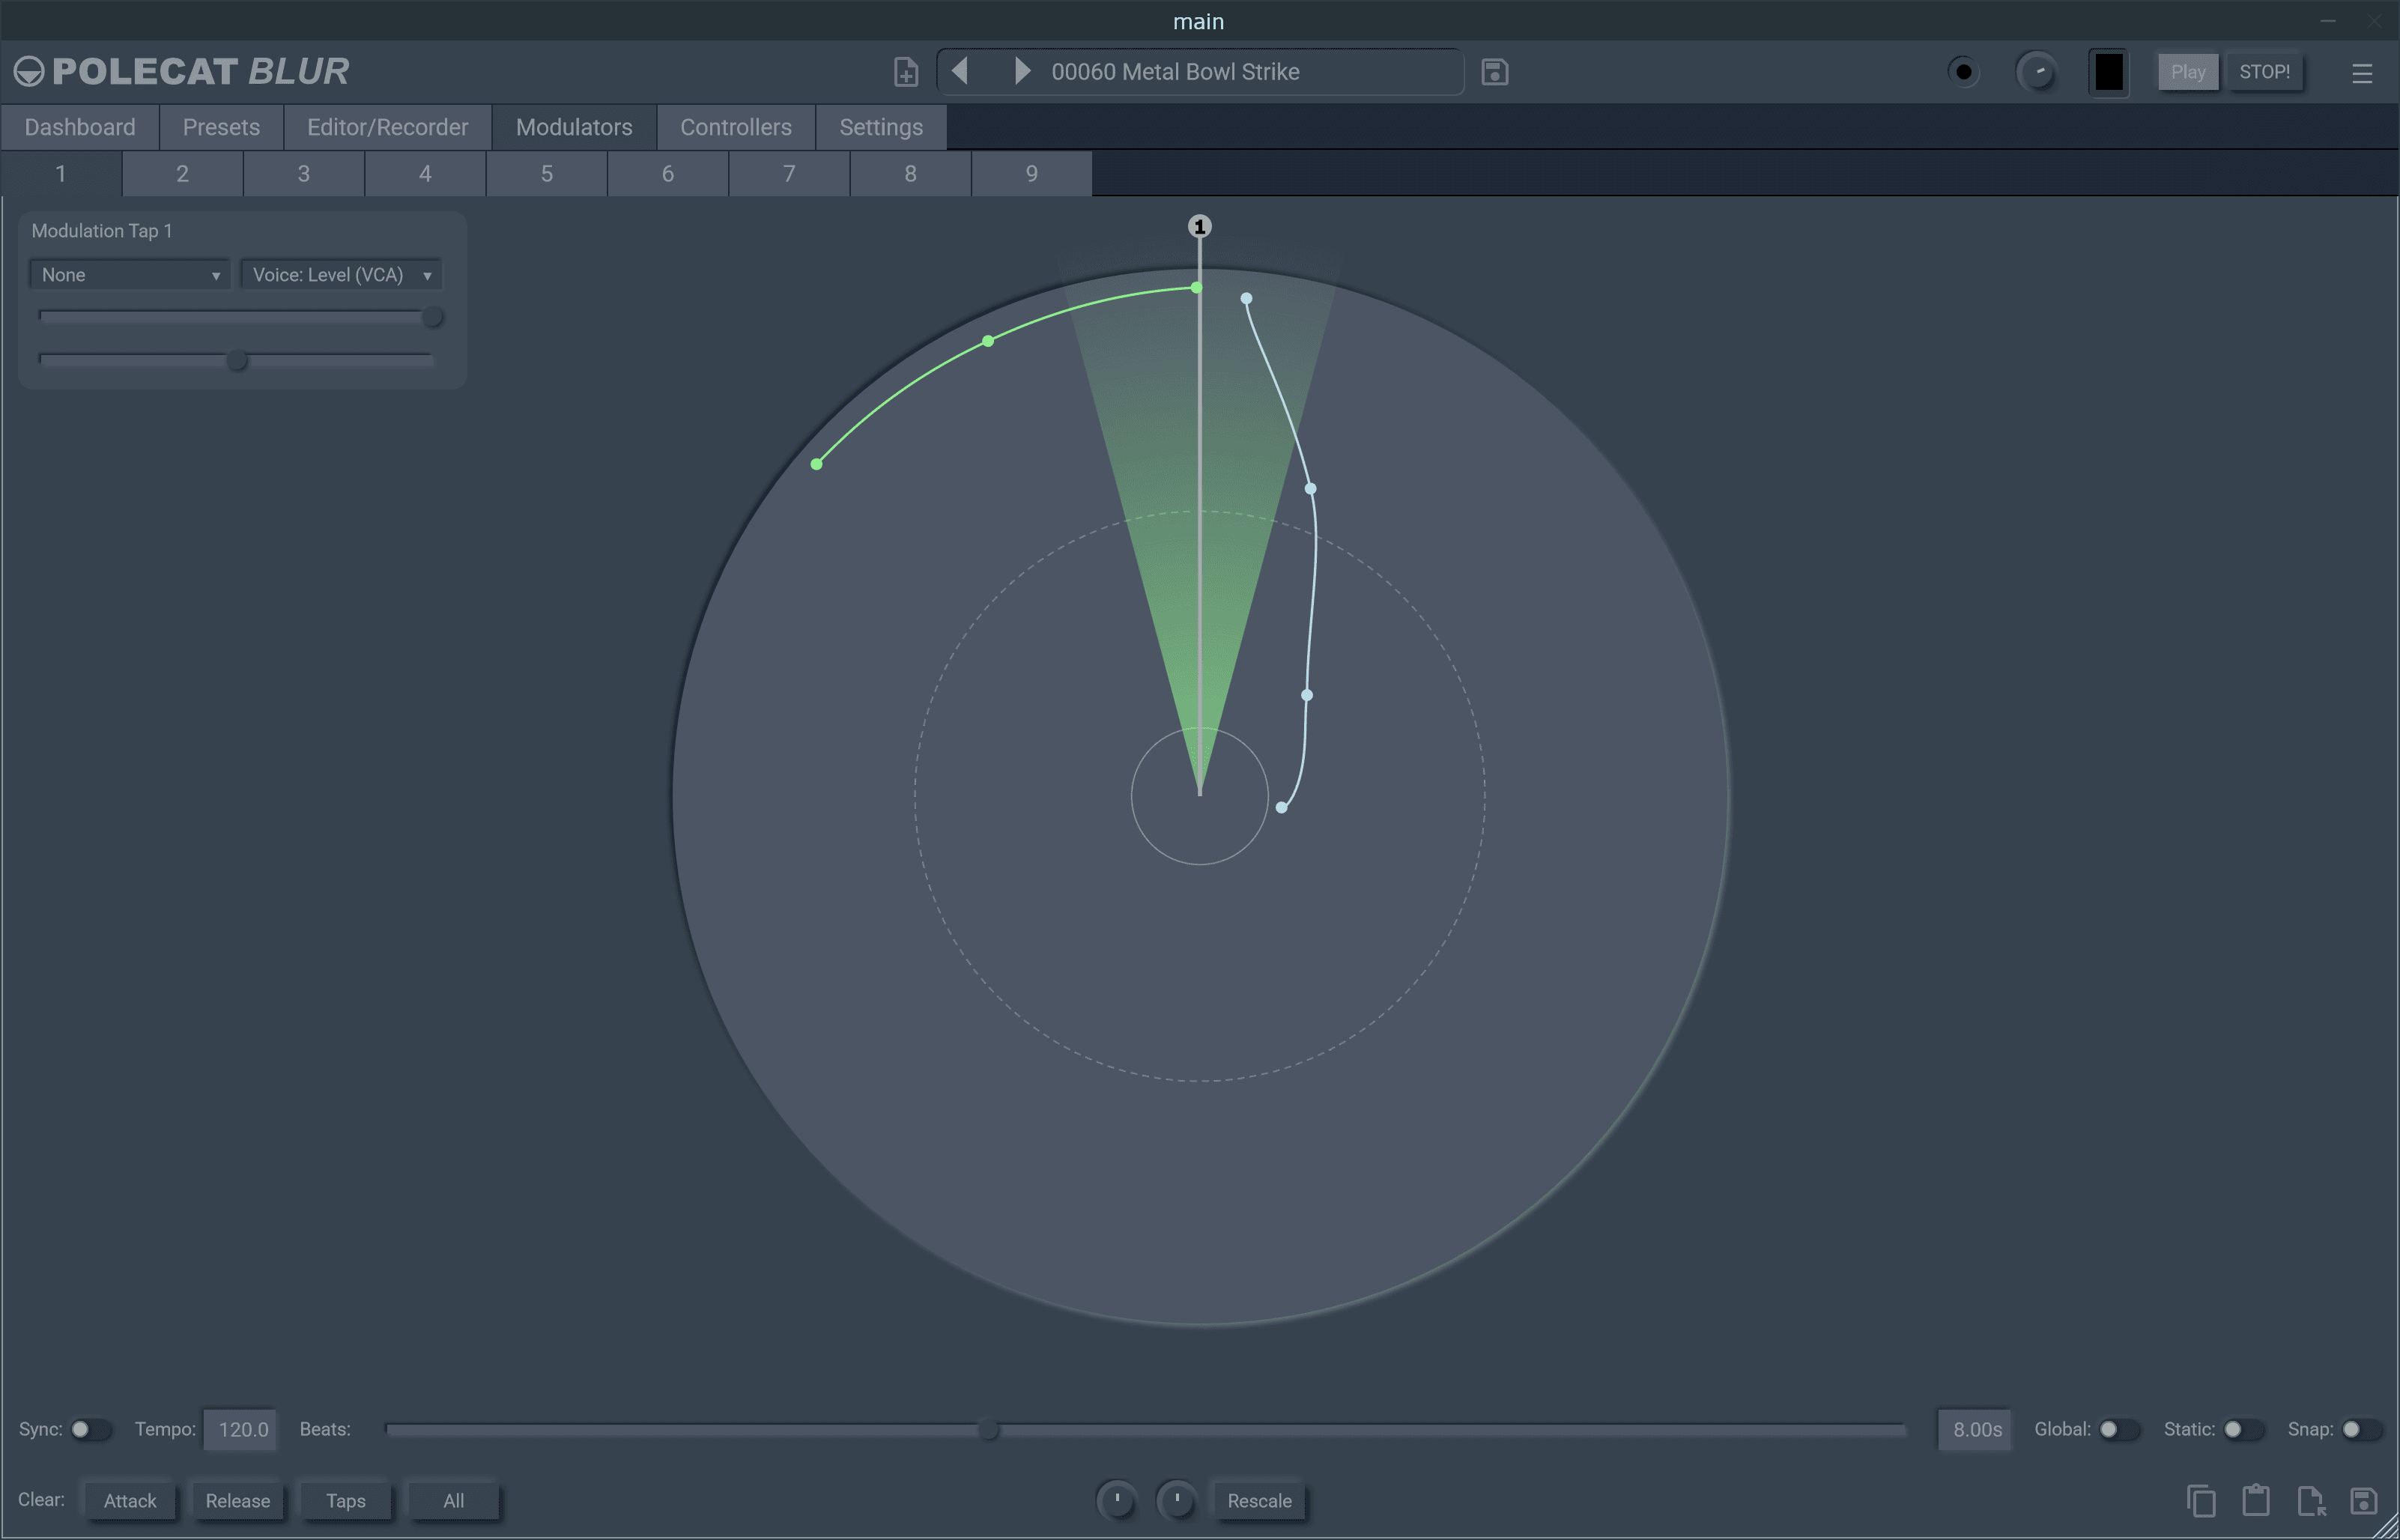
Polecat Blur Modulators tab

Modulators — add movement over time

Each of the nine modulators is a drawable, repeatable motion shape. Create an envelope or cycle, place taps around its rim, and send those taps to the parameters that should move.

First modulator: make one parameter move on purpose

A modulator provides time and shape. It does not make a sound change until an output tap is assigned to a destination. Start with one audible destination, a modest amount, and a simple shape. The following procedure makes a filter drift; the same sequence works for a level, spatial position, or delay control.

1. Establish a still reference

Load or build a patch with a continuous sound, then press the toolbar Play control so it can run while you edit. Choose one channel and set the target control to a useful neutral value. For a filter experiment, enable the filter and set Frequency where the sound is clearly audible but has room to become darker or brighter.

Listen to this unmodulated state for a few seconds. You need a reference before adding motion; otherwise it is hard to tell whether the shape, amount, or underlying sound is responsible for what you hear.

2. Choose a modulator and make a simple contour

Open the Modulators tab and select an unused numbered modulator. In the circular editor, click to begin the Attack path and add only enough points to describe a gentle rise. Then draw a Release path that returns toward the starting value. A broad, simple rise and fall is the right first test because its effect is easy to hear and easy to correct.

Do not try to make a complex orbit immediately. Drag a point to adjust it, double-click a point to remove it, and double-click a path segment only when a new point is genuinely needed. The shape is one complete cycle, so draw in its time order rather than crossing the path back over itself.

3. Decide when the cycle runs

Turn Sync on when the movement should align to musical beats. Set Beats to a slow value first, so the shape has time to be heard. With Sync off, set the same duration in seconds for free-running motion; this is often more appropriate for an independent atmosphere or a standalone session.

Choose Global when every active voice should share the same cycle. Use voice scope when each note should begin its own cycle. Static stops the cycle at its current state, which is useful for inspecting a particular phase before deciding whether the timing or shape is the issue.

4. Create the output tap and assign it

Double-tap the outer rim to create an output tap. Select that tap in the Modulation Tap panel, choose the source curve, then choose the destination parameter. For this first experiment, select the selected channel's filter Frequency rather than a parameter that can quickly become unstable, such as feedback or resonance.

Begin with a low Amount and use Fine Trim for the final adjustment. Let the cycle repeat several times. If the destination does not move, check the full chain in order: the modulator has a drawn shape, the tap exists, the tap is selected, its source is assigned, its destination is assigned, and its amount is above zero.

5. Align the movement without redrawing it

Drag the individual tap around the rim to make that one output happen earlier or later in the cycle. This changes the timing of the assigned result without changing the curve. Add a second tap on the same rim only when you need a related destination to read the same shape at a different phase.

Drag the outer rim when the whole shape is late or early. That rotates the Attack and Release paths together. Use Alt while rotating if the grid orientation should remain fixed. This distinction matters: move a tap to change one relationship; rotate the rim to move the whole modulation design.

6. Refine, preserve, or remove it

Enable Snap for repeatable point placement; disable it for looser movement. Scale changes the height of the complete shape and Offset moves it up or down. Use Rescale only when that transformed result should become the new editable baseline.

The Clear controls let you undo narrowly: Attack removes only the attack path, Release only the release path, and Taps removes the assignments while preserving the drawing. Use All only when you intend to erase the complete modulator. Save a reusable design, or copy it before a risky variation; after loading or pasting, always review its taps, destinations, and depths in the new patch.

Choose a modulator and draw its shape

Select one of the numbered Modulator tabs. The circular editor represents one complete motion cycle. Click in the circle to start an Attack path, then continue placing points to draw the rise or movement you want. Once the attack is complete, draw a Release path to describe how the motion returns or falls away. Drag a point to refine it; double-click a point to remove it; and double-click a path segment to insert a new point exactly where the curve needs more detail.

Use simple shapes first. A gentle arc is effective for filter drift or spatial movement; a steeper rise and fall is better for a more obvious swell. The editor keeps the points in time order, so build the contour in the direction of the cycle rather than trying to cross back over it.

Set the timing and scope

Sync locks the cycle length to beats. Use the Beats control to set the duration in musical time; in the standalone app, Tempo supplies the clock. With Sync off, the same control sets a free-running duration in seconds instead. Beat-sync is the right choice when movement must stay aligned with a DAW; free time is often more natural for independent ambience.

Global runs one shared cycle for the whole patch. In voice scope, each note can have its own cycle, which is useful for a playable patch whose modulation starts with every note. Static holds the current state instead of advancing it, making it useful for checking a particular phase or for an intentionally fixed offset. It is also the mode to use when you want to keep editing a shape while the patch plays: its control points stay visible and editable, where a rotating shape hides them.

Use the rim to place and align output taps

A tap is the point on the modulator's cycle where an output is read. Double-tap the outer rim to add an output tap at that phase. Each new tap appears in the Modulation Tap list, ready to be assigned. Double-tap an existing tap on the rim to remove it.

Drag an existing tap around the rim to re-align its timing. This is the fast way to move a filter opening, panning turn, or delay change earlier or later without redrawing the underlying shape. Two taps can read the same curve at different phases, giving related but offset movement from one modulator.

Assign each tap

Select a tap in the Modulation Tap panel. The first menu chooses its source: select the control curve that should shape the tap, or leave it unassigned until the curve is ready. The destination menu chooses the sound parameter to move, such as a layer level, filter cutoff, spatial position, or a delay control. The three spatial destinations are listed as Pan X, Pan Y, and Pan Z, corresponding to the left–right, front–back, and up–down axes of the Surround Panner. Every channel and every delay offers the same three.

The main Amount control sets the depth of the assignment; use the Fine Trim control to make small, precise corrections without disturbing the broad range. Begin with a low amount, particularly for pitch, resonance, feedback, and spatial destinations. Add more only after the movement is clearly doing useful work.

Grid, transform, and clean-up controls

Enable Snap to place and move points against the visible grid. It is useful for repeatable, intentional shapes; turn it off for looser gestures. Scale changes the height of the complete shape and Offset moves it up or down. Use Rescale to apply the current transform to the path when you want to continue editing from that new baseline.

The Clear controls are deliberately narrow: Attack removes only the attack path, Release only the release path, and Taps removes the routing points while leaving the drawn shape intact. All clears the complete modulator. This makes it practical to preserve an interesting motion while replacing only its routing.

Rotate the timing of the complete shape

Drag the outer rim to rotate the attack and release paths together, re-aligning the entire modulation cycle against the beat or free-running clock. This changes when the shape occurs, not its internal contour. Hold Alt while rotating when you want to keep the grid orientation fixed. Use this gesture when every tap is early or late by roughly the same amount; move individual taps only when their relative timing should differ.

While the shape is rotating, the editable control points on the paths are hidden and return when rotation stops. They cannot be usefully grabbed on a moving path, and hiding them keeps the animation legible. Static is the exception: it holds the paths still precisely so they stay editable during playback, so its control points remain visible.

Save reusable motion

The save, load, copy, and paste buttons at the bottom of the editor let you reuse a complete modulation design. Save a motion you expect to use in other presets; copy and paste is quicker for variations inside the current session. After loading or pasting, review the taps and destinations—an otherwise useful shape may need different depths in a new patch.

Polecat Blur Controllers tab

Controllers — make performance repeatable

The controller editor turns MIDI and note information into deliberate response curves, then makes each curve available as a source for one or more sound parameters.

First controller: turn an input into a controlled response

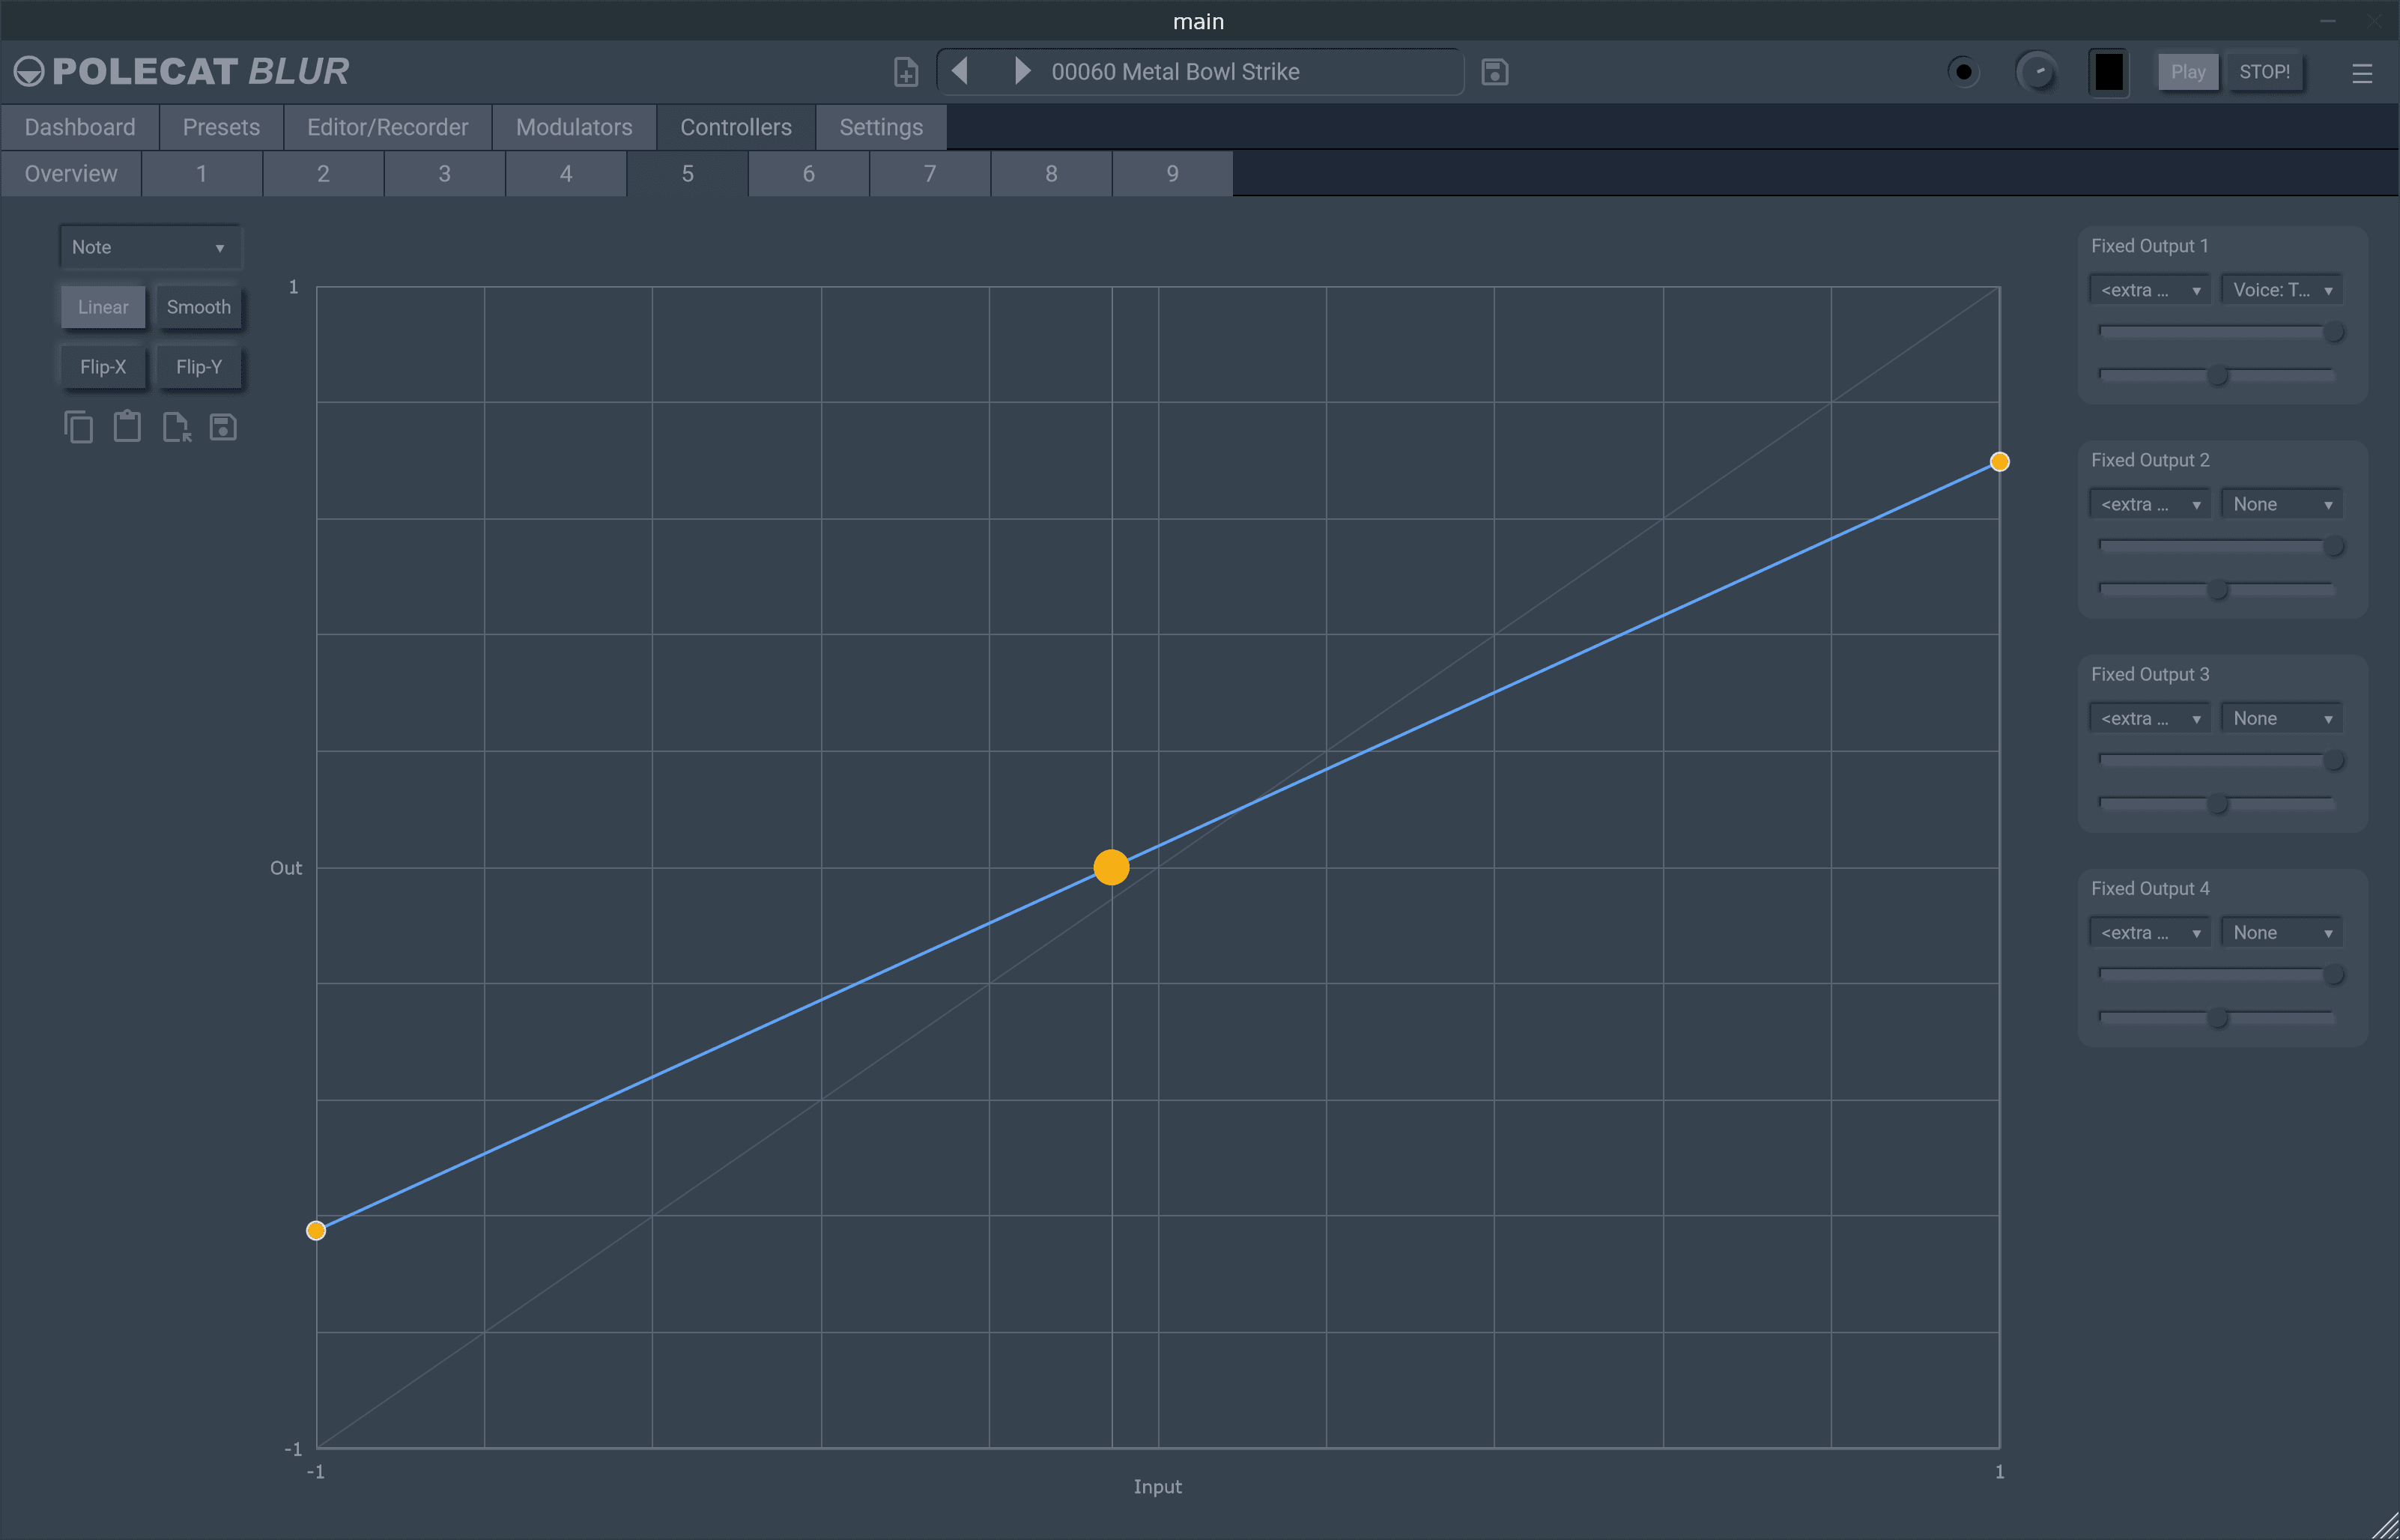
A controller curve translates note information or MIDI data into a value. Use it when the sound should react to how it is played or to a physical controller. The curve describes the response; a Fixed Output or Modulation Tap connects that response to a parameter.

1. Choose one input you can test

Open the Controllers tab and select a numbered controller. Choose its primary input before editing anything: note value for pitch-dependent behaviour, velocity for playing intensity, or an available MIDI controller for a hardware control. The graph's horizontal axis is this incoming value; the vertical axis is the value the curve produces.

Make sure you have a way to generate the input while you listen. For note value or velocity, play notes from the intended MIDI source. For a MIDI controller, move the physical control. The toolbar Play control sustains a note for sound design, but it is not a substitute for varying the MIDI input you are trying to map.

2. Shape the response before assigning it

The diagonal line is the direct, unaltered mapping. Click it to add a point, then drag the point upward to increase the curve's output for that part of the input range or downward to reduce it. Adjust the end points when the response should begin above zero or should not reach full scale.

Build the smallest curve that expresses the idea. A single centre point can make soft notes less active, make a middle range more prominent, or create a useful threshold. Double-click a point to remove it. Extra points are justified only when you can describe the specific range or transition they control.

3. Select the curve character and direction

Use Linear when the response should change in direct, predictable segments. Use Smooth when the joins between points should be rounded, particularly for gradual tone, level, or spatial changes. Play or move the source while switching between them; the same point positions can feel quite different when the transition is smoothed.

Use Flip-X to reverse the input direction and Flip-Y to invert the output. These are preferable to redrawing a curve that has the right shape but runs the wrong way. Confirm the direction with a single obvious gesture before continuing to an assignment.

4. Make one Fixed Output assignment

In the first Fixed Output slot, select one destination and begin with a small Amount. Use Fine Trim only after the broad range is correct. For example, map velocity to a modest filter-frequency change, or map a MIDI controller to a deliberately limited channel level. Play or move the input across its range and listen for a response that is clear but controlled.

Each curve has four Fixed Output slots. Add a second destination only after the first is working. Several destinations can make a single gesture expressive, but they also make diagnosis harder. When the result is too large, lower the assignment Amount before redrawing the curve.

5. Add an extra input only when it has a role

The extra-input menu in a Fixed Output slot multiplies the controller curve by a second control source. Use it when one response should be scaled by another—for example, when a note-value curve should be made more or less active by a performance control. Leave it set to None while establishing the primary mapping.

Test both inputs independently and together. If a mapping appears to stop working, check whether the extra input is at a value that reduces the output. This is the common consequence of adding a second multiplier before the first curve has been verified.

6. Use a controller curve inside a modulator

A controller curve can also be selected as a source in a Modulation Tap panel. First finish and test the controller curve. Then create or select a modulator tap, choose that controller curve as the tap's source, choose the destination, and start with a low tap Amount.

This combines two distinct decisions: the controller curve determines how incoming performance data is translated, while the modulator and its tap determine when that value is read and how deeply it affects the destination. Verify each part separately before treating their combined behaviour as a single problem.

7. Verify the mapping and keep the useful version

Test the lowest, middle, and highest useful input values. Listen for abrupt jumps, an unexpected inactive range, inversion, or an amount that is too large once other modulation is active. If a destination already has automation or a modulator, reduce the smallest effective amount until the combined movement is still intentional.

Save a controller curve that has a reusable response. Copy it before experimenting with major changes; use paste for a variation within the current session. When loading a saved curve, check the primary input and every Fixed Output destination before relying on it, since a useful curve can need different routing or depth in its new patch.

Choose the incoming controller source

Select a numbered controller tab, then choose the primary input from the menu at the top left. This can be note information or an available MIDI controller source. The horizontal axis of the graph is the input value; the vertical axis is the value the curve will output. Choose the source first, because it defines the range and behaviour you are shaping.

For example, use note value to make higher notes open a filter, velocity to scale brightness or level, or a MIDI controller to turn a physical knob into a deliberately limited, musical range.

Edit the curve

The diagonal line is the unaltered response. Click the line to add a control point, then drag it to bend the response. Dragging up increases the output for that input region; dragging down reduces it. The end points stay at the ends of the input range, but their vertical values can be adjusted, allowing a controller to have a minimum or maximum other than the usual zero and full-scale values.

Double-click a control point to remove it. Use a small number of points whenever possible: one centre point can create a useful dead zone or emphasis, while extra points are best reserved for deliberate thresholds and non-linear performance behaviour.

Choose Linear or Smooth, then flip when needed

Linear joins points with straight segments, producing a direct, predictable mapping. Smooth rounds the joins for a more gradual response, which is usually preferable for slow expressive controls or spatial movement. Flip-X reverses the input direction; Flip-Y inverts the output. Use the flips before redrawing a curve that is otherwise correct but runs in the wrong direction.

Assign a fixed output

Each controller curve provides four Fixed Output slots. In a slot, use the destination menu to choose the parameter the curve will control. The Amount control sets the contribution of the curve, while Fine Trim makes close adjustments. Assigning the same curve to several slots is an efficient way to make one gesture change several aspects of a sound—for example, opening a filter while increasing a delay send.

The extra-input menu in each Fixed Output slot can multiply the curve by a second control source. This is a practical way to make a mapping conditional or expressive: for example, a curve can respond to note value but be scaled by a performance controller. Leave the extra input set to None when the curve should act alone.

Connect controllers to modulators

The controller curves are also available as sources in the Modulation Tap panels. To make a controller shape a modulator, first create and edit the controller curve, then select that curve as the tap's source and choose the modulator destination. The tap determines when in the modulator cycle the value is read; the controller curve determines how the incoming note or MIDI value is translated.

This distinction is useful: use the controller editor to define the response to performance data, then use the modulator to decide its timing and the tap depth to decide its musical range.

Work safely with assignments

Start with one curve, one destination, and a small amount. Confirm the response while playing or using the toolbar Play control, then add further outputs only when the relationship is clear. When a destination already has automation or modulation, use the smallest effective amount so the combined movement remains controllable.

The curve's save, load, copy, and paste buttons make mappings portable. Save an especially useful response curve for reuse; copy it before experimenting with a destructive variation. After loading a curve, check its input source and Fixed Output destinations before relying on it in a new preset.

Settings

Set the environment before the session.

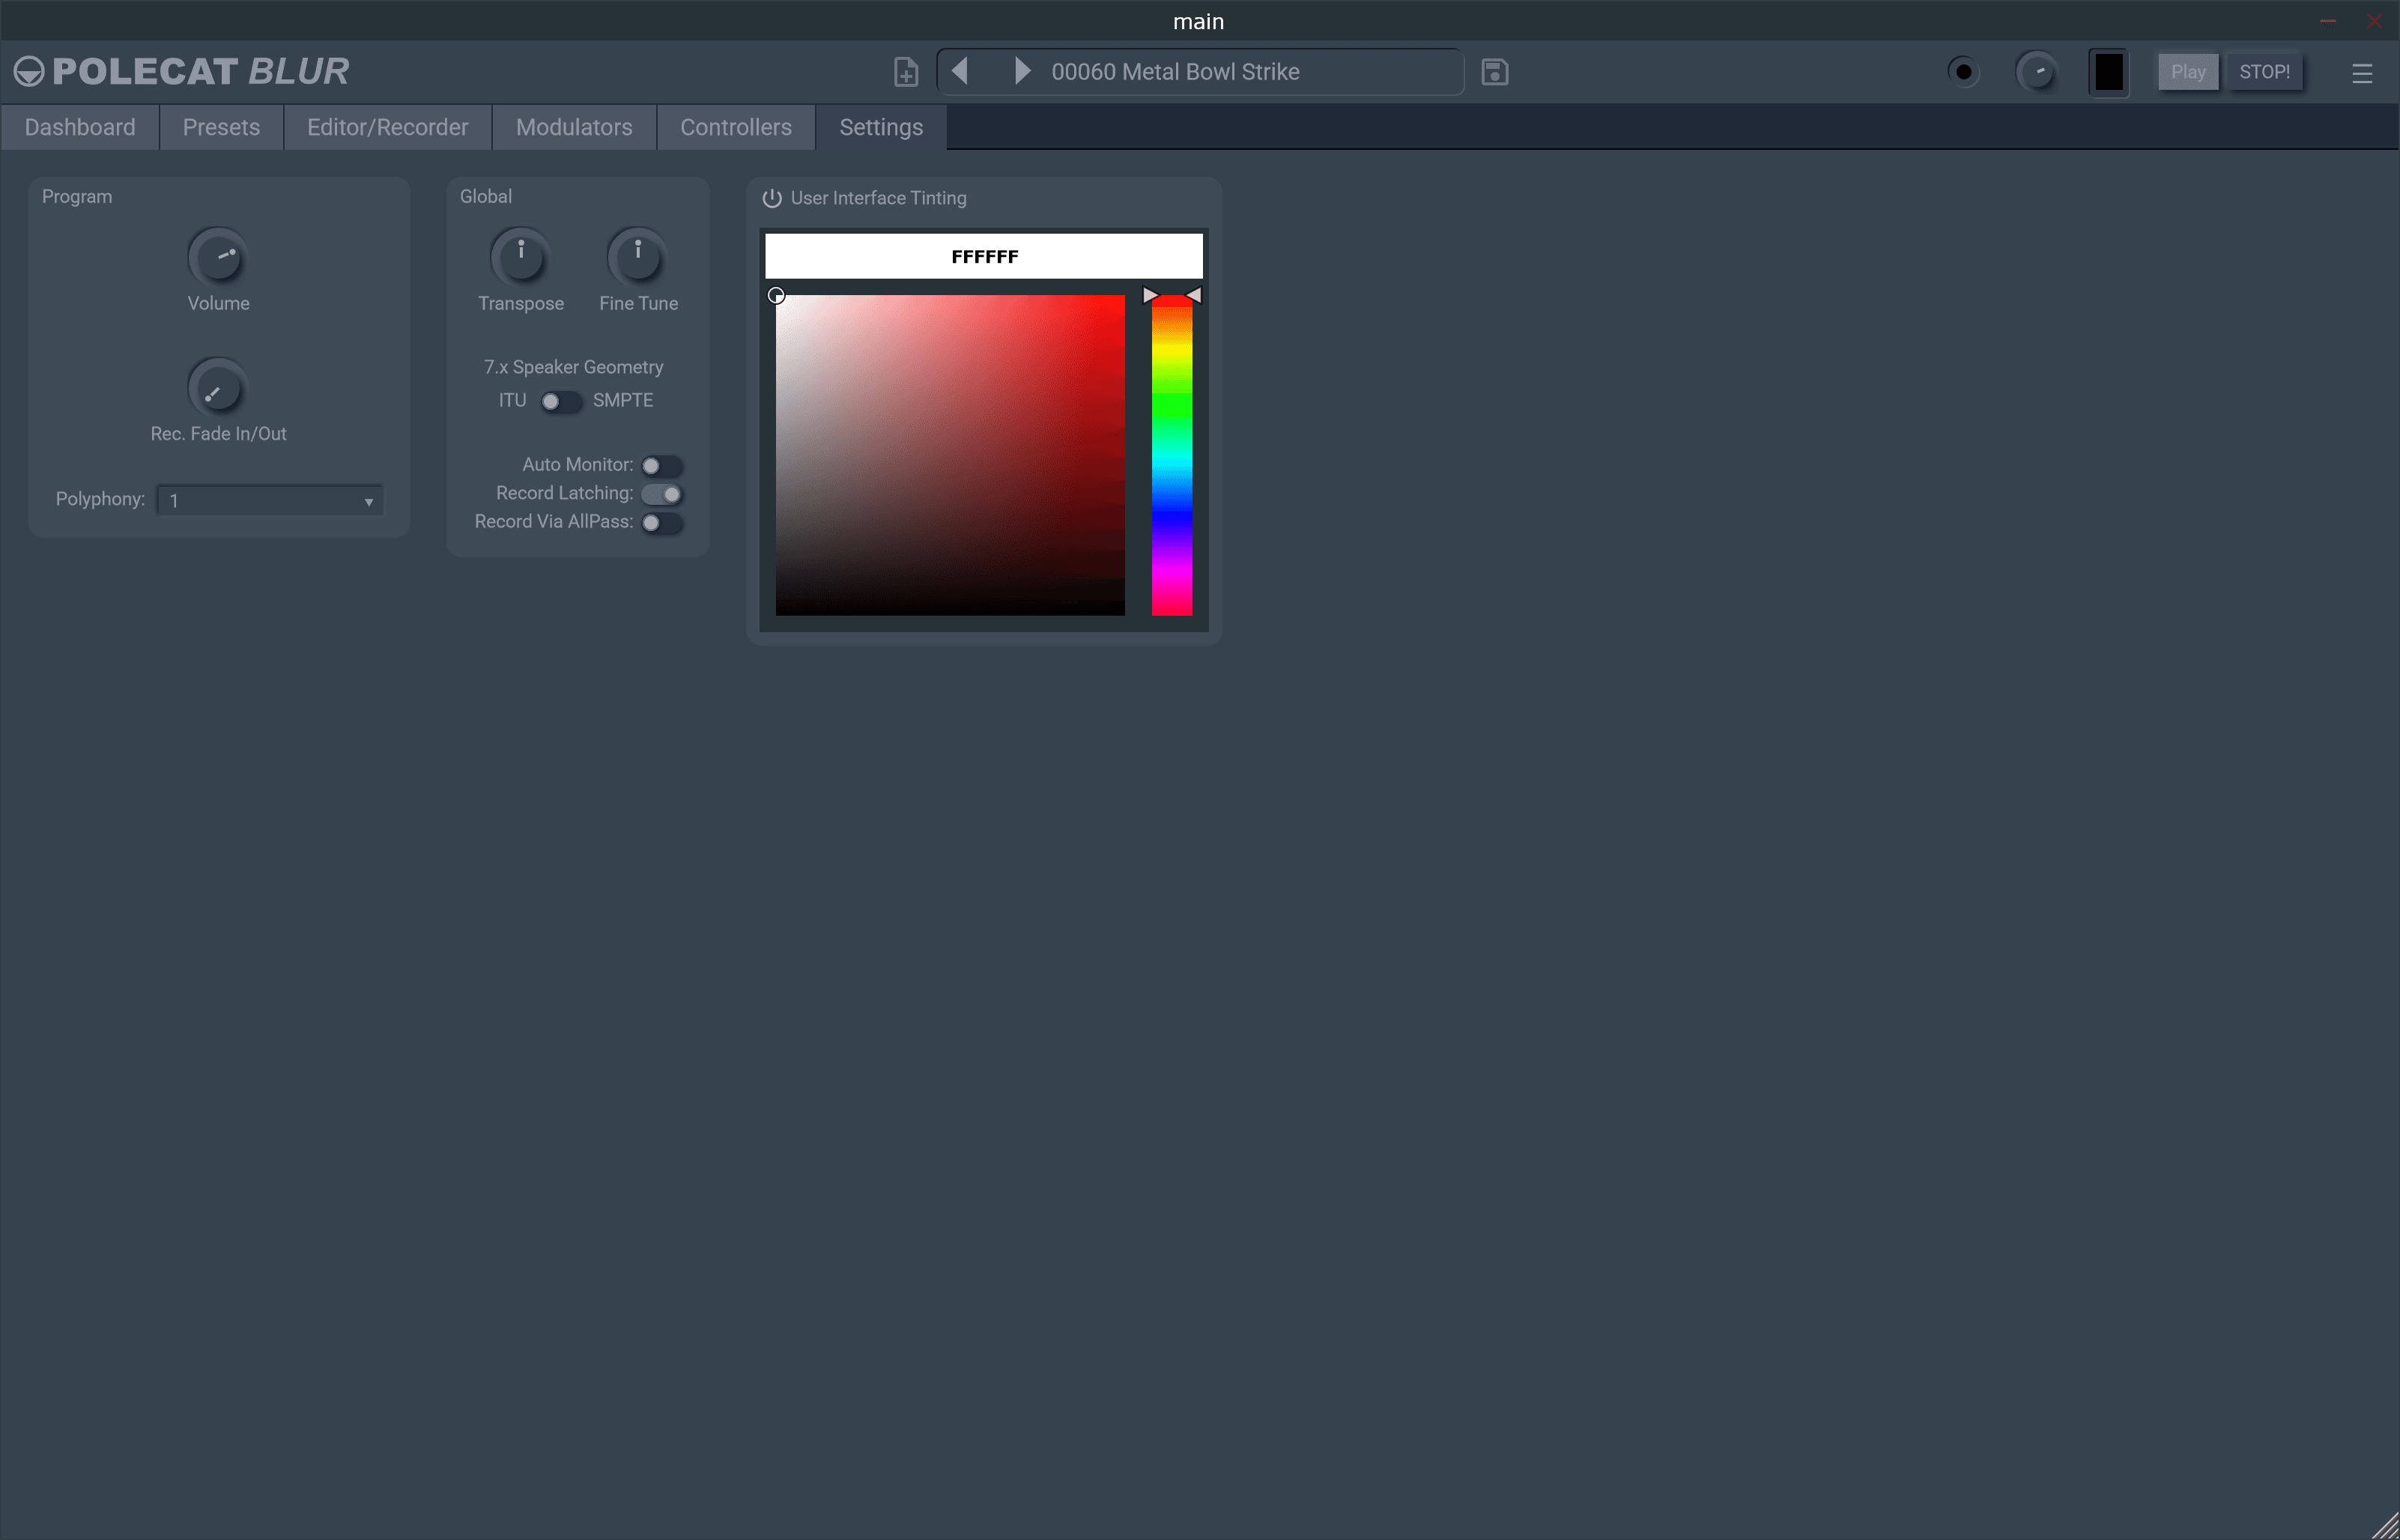
Settings separates the choices that define a sound from the ones that define your working environment. Check them before recording, then use the session-wide controls deliberately when moving between presets.

Polecat Blur Settings tab
Use Settings to verify the environment around the instrument.

For the standalone app, confirm that the expected audio device is available before recording or auditioning.

In a DAW, use the VST3 plug-in and let the host manage audio device configuration and project sample rate.

Installation and licence help

Polyphony and note mapping

Polecat Blur is designed first for soundscapes built from a single, atonal note. Polyphonic patches are still possible when only a small number of channels are active and the host has sufficient processing headroom, but they should be approached as an exception rather than the default. A controller preset is supplied for mapping note values, so a compatible controller can address those pitches without rebuilding the assignment from scratch.

Record fade in/out

Record Fade In/Out automatically eases the source in when a channel's Record button is latched and eases it out when Record is released. It is especially useful with sources whose level cannot easily be controlled—live inputs, hardware, or recordings that begin abruptly—because it avoids a hard edge at the capture boundary.

Program Volume

Program Volume mirrors the volume control in the application task bar, but it is saved with each preset and restored when that preset loads. Use it to balance the perceived level of presets so they can be browsed and auditioned without an unpleasant jump in loudness. It is a preset-balancing control, not a substitute for setting the overall monitoring level.

Global controls and tuning

Global controls belong to the session rather than to an individual preset. Transpose and Fine Tune therefore remain in effect as you load different presets, giving a consistent tuning reference across an audition. Set them with that global behaviour in mind: changing them affects every preset you open in the session.

Speaker Geometry

Speaker Geometry is a project-level Preference, not a preset setting. It determines the arrangement of the green speaker dots and the available panner dimensions for the current session. Configure it before positioning channels; see Part I for how it interacts with the host track's channel support and disabled spread controls.

Auto Monitor

With Auto Monitor enabled, pressing New or Erase on a channel automatically puts that channel into Monitor mode. This is a convenient default when replacing recorded material: the source becomes audible immediately, ready to check before the next take. Disable it when you prefer to control monitoring manually.

Record Latching

Record Latching makes the channel Record buttons stay active until you turn them off. Disable it to make the buttons momentary instead: recording then continues only while the control is held. That is useful for very short sounds, single impacts, and tightly timed snippets where a held gesture is more precise than a toggle.

Record Via Allpass

Record Via Allpass gently smooths the input before it is captured, which can make percussive material less sharp and more immediately usable as a blurred texture. It can also make sustained or already-diffuse sources muddy, so leave it disabled in most cases and enable it only when a transient needs softening at the source.

User Interface Tinting

User Interface Tinting lets you set the colour treatment for the entire interface. The tint is saved with the plug-in preset, allowing different visual identities to travel with particular sounds—for example, a restrained palette for utility patches and a more distinctive colour for a favourite performance preset.

Output Format

Output Format decides how Polecat Blur lays its channels out across the track it has been given. You can choose any layout that fits the track, not only one that uses every channel: on an eight-channel track you can render 5.1, quad, or stereo, and the dialog shows how many of the available channels the chosen format uses. Channels the format does not use are left silent for something else on the bus to fill.

Output Format when the host names the arrangement

Some hosts name the track arrangement themselves; REAPER does so at every width. Output Format remains available in that case, and the dialog says so. The choice only affects what Polecat Blur produces into the channels it has already been given—it never asks the host to change the track—so you can still pick an alternative speaker mapping and keep the host's arrangement intact.

Input channels

Polecat Blur accepts up to eight input channels, matching the eight blur layers a recording source can feed. Wider inputs are not used, so route the eight channels you actually intend to capture rather than relying on a wider bus reaching the instrument.
Accessibility

Choose an interface theme that works for you.

Accessible Light, Accessible Dark, and Accessible Wasp provide three high-contrast interface options. They are personal application preferences, not part of a preset.

Open the three-line menu at the far right of the top toolbar, choose Theme, then select Accessible Light, Accessible Dark, or Accessible Wasp. You can return to the same menu at any time to choose another theme.

Use the light or dark version to suit your viewing environment. Accessible Wasp uses bright yellow on black for a distinctly high-contrast alternative.

Polecat Blur using the Accessible Light theme
Accessible Light
Polecat Blur using the Accessible Dark theme
Accessible Dark
Polecat Blur using the Accessible Wasp theme
Accessible Wasp
Next step

Build a small vocabulary of sounds.

A handful of well-labelled presets—an uneasy room tone, a distant metallic impact, a widening transition, a playable ambient instrument—will take you further than one overworked all-purpose patch.

Save useful channels independently as material for future composite sounds. Likewise, store new modulation and control-editor presets when they are worth reusing; they can provide a strong starting point for new sounds later.